Learning how to find any note on the piano becomes much easier when beginners understand the repeating pattern of black keys.
When beginning piano students first look at the keyboard, all those white and black keys can feel overwhelming.
Where is D?
Where is F?
How can you find A without counting all the way from Middle C?
The good news is that you do not need to memorize the location of every individual key.
The piano keyboard has a repeating pattern. Once you understand the groups of two black keys and three black keys, you can use them as landmarks to find every white key on the piano.
As a piano teacher, this is one of the first keyboard skills I teach beginners.
First, we learn how to find C. Then we use the same black-key patterns to find D, E, F, G, A, and B.
After students can find individual notes comfortably, I take the exercise one step further. I teach them how to find a second note above or below a starting note.
That skill becomes very important later when students begin playing intervals, chords, and harmony.
How to Find Any Note on the Piano Using Black-Key Patterns
Look at the piano keyboard.
You will see the same pattern repeated from the bottom of the piano to the top:
Two black keys — three black keys — two black keys — three black keys
These groups are some of the easiest landmarks for beginning students to recognize.
Instead of looking at a large keyboard filled with dozens of white keys, I want students to see these smaller repeating patterns.
Once they can recognize them, finding note names becomes much easier.
How to Find C, D, and E
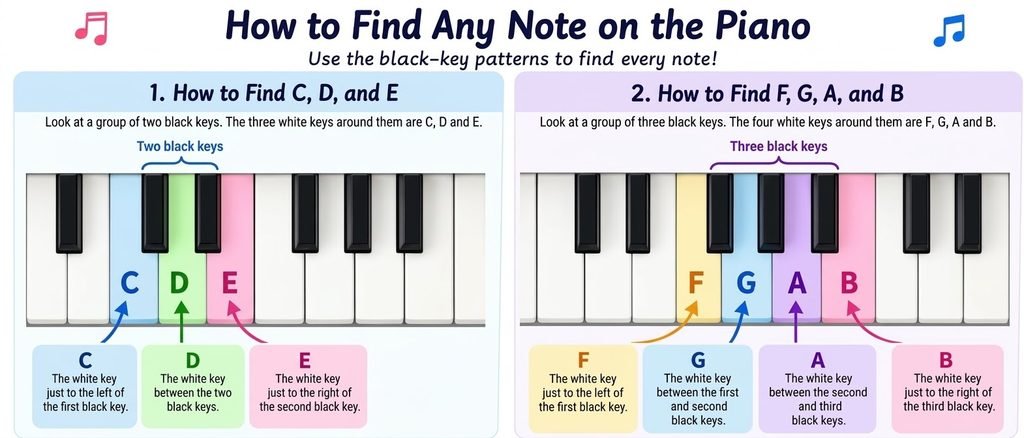
Learning how to find any note on the piano starts with recognizing group of two black keys.
Let’s begin with a group of two black keys.
The three white keys surrounding those two black keys are:
C – D – E
How to Find C
Find a group of two black keys.
The white key immediately to the left of the first black key is C.
Every group of two black keys has a C immediately to its left.
This is the same pattern we used when learning how to find Middle C.
How to Find D
Now look at the same group of two black keys.
The white key between the two black keys is D.
I often describe D to beginning students as the white key sitting right in the middle of the two black keys.
If you can see two black keys, finding D is very easy:
Look between them.
That is D.
How to Find E
Stay with the same group of two black keys.
The white key immediately to the right of the second black key is E.
So one group of two black keys helps us find three notes:
C – D – E
C is on the left.
D is in the middle.
E is on the right.
How to Find F, G, A, and B
Another important step in learning how to find any note on the piano is recognizing groups of three black keys.
Now find a group of three black keys.
The four white keys surrounding those three black keys are:
F – G – A – B
How to Find F
Find three black keys.
The white key immediately to the left of the first black key is F.
So when my students are looking for F, I tell them to first find the group of three black keys.
Then look immediately to the left.
That is F.
How to Find G
Look at the first and second black keys in the group of three.
The white key between the first and second black keys is G.
How to Find A
Now look at the second and third black keys.
The white key between the second and third black keys is A.
How to Find B
Finally, look at the last black key in the group of three.
The white key immediately to the right of the third black key is B.
Now we have all seven note names:
C – D – E – F – G – A – B
And then the pattern begins again.
There Is More Than One C, D, E, F, G, A, and B
This is something I want beginning students to understand very early.
There is not just one F on the piano.
There are many F’s.
The same is true for C, D, E, G, A, and B.
The note names repeat across the entire keyboard.
Try Finding Every F on the Piano
One exercise I like to give my students is:
“Can you find all the F’s?”
Start on the left side of the piano.
Remember the rule:
Find three black keys. F is the white key immediately to the left.
Find the first F.
Then move to the next group of three black keys and find another F.
Continue across the entire piano:
F – F – F – F – F…
The student does not need to count from Middle C every time.
They simply repeat the same visual pattern:
Three black keys → first white key on the left → F.
This exercise can be repeated with any note.
I might ask:
“Can you find all the D’s?”
The student looks for every group of two black keys and finds the white key between them.
Or:
“Can you find all the A’s?”
The student finds each group of three black keys and looks between the second and third black keys.
This helps students recognize the entire keyboard instead of memorizing only one small area around Middle C.
The Next Step: Find Two Notes in the Correct Direction
Once a student can find individual notes easily, I make the exercise more challenging.
This is where students begin learning that finding the correct note name is not enough.
The note also needs to be in the correct direction.
Find E, Then Find A Going Up
For example, I might say:
“Can you find E?”
The student finds any E on the piano.
Then I say:
“Now find A going up.”
The student should not simply find any A.
The student needs to find the A that is higher than that E.
Starting from E, we move upward:
E – F – G – A
The student has now found two notes:
E and the A above it.
This teaches the student to pay attention not only to note names but also to direction on the keyboard.
Practice Going Down Too
Then I reverse the exercise.
I might say:
“Can you find D?”
The student can choose any D.
Then I say:
“Now go down five notes and find G.”
Starting on D and counting downward:
D – C – B – A – G
The student should end on the G below the original D.
The important part is that the student does not simply search for any G on the piano.
The starting D becomes the reference point.
From that reference point, the student has to understand:
Am I going up or down?
How far do I need to go?
Where should the second note be?
Why This Exercise Is So Important
Once students understand how to find any note on the piano, they can move around the keyboard with much more confidence.
I see a common problem with beginning students when they start playing two notes together.
Suppose the music requires a D on the bottom and B on the top.
A student may correctly recognize the two note names as D and B, but then play them in the wrong order.
They may put B on the bottom and D on the top.
Or they may simply find any D and any B without paying attention to their relationship on the keyboard.
I do not want students to think:
“I see D and B, so I just need to find a D and a B.”
Instead, I want them to understand:
Which note is lower?
Which note is higher?
Where is the second note in relation to the first one?
That is why I teach students to find one note first.
The first note becomes their reference point.
Then they find the second note by moving up or down from that first note.
This Prepares Students for Intervals and Harmony
This simple keyboard exercise becomes much more important as piano music gets harder.
Later, students will need to recognize intervals, play two notes together, read chords, and understand harmony.
They cannot simply know that two notes are called D and B.
They need to understand the physical and musical relationship between those notes.
Is B above D?
Is it below D?
How far apart are they?
Learning to think this way from the beginning helps students become more accurate and independent readers.
Practice How to Find Any Note on the Piano
Parents can also use this as a short practice game at home.
Level 1: Find One Note
Ask the student to find a G, an E, and then a B.
The student can choose any correct note on the piano.
Level 2: Find Every Note With the Same Name
Ask:
“Find every F on the piano.”
The student moves from the left side of the keyboard to the right and finds every F.
Try the same exercise with D, A, or another note.
Level 3: Find a Second Note Going Up
Ask:
“Find E. Now find A going up.”
The student must keep the first note as a reference and locate the correct A above it.
Level 4: Find a Second Note Going Down
Ask:
“Find D. Now go down five notes to G.”
The student must count in the correct direction and find the G below D.
These exercises can take only a few minutes, but they build several important keyboard skills at the same time.
How to Find Any Note on the Piano without Depending on Middle C
Knowing how to find any note on the piano means students do not have to depend on Middle C every time.
Middle C is an excellent landmark for beginning piano students.
But I do not want my students to depend on Middle C forever.
If a student needs to find F near the top of the piano, they should not have to find Middle C first and count all the way up.
Instead, they should recognize:
Three black keys → F is immediately to the left.
If they need D:
Two black keys → D is between them.
Eventually, students should be able to look anywhere on the keyboard and quickly recognize the notes around them.
Final Thoughts: How to Find Any Note on the Piano
Learning how to find any note on the piano becomes much easier when students understand the repeating black-key pattern.
Use the two black keys to find:
C – D – E
Use the three black keys to find:
F – G – A – B
Then practice finding every note with the same name across the keyboard.
Once that becomes comfortable, take the next step.
Find one note first and use it as a reference point. Then find a second note by moving up or down from the first note.
This teaches much more than where the keys are.
It teaches students to understand direction, distance, and the relationship between notes—skills they will use later when reading intervals, chords, and harmony.
The goal is not just to find the right letters.
The goal is to understand where those notes are in relation to each other on the piano.