What is a tie in music, and how do you play tied notes correctly on the piano?
When beginning piano students see a curved line connecting two notes, they often wonder what it means.
Should they play both notes? Should they hold the first note longer? Or does the curved line mean they should play smoothly?
After teaching piano for 25 years, I have noticed that ties can be confusing for many beginners.
One of the most common mistakes I see is students playing the second note again instead of holding the first note.
However, understanding a tie in music becomes much easier when students learn a few simple rules.
In this guide, I will explain what a tie means, how it differs from a slur, how to count tied notes, and eight practical teaching tips I use in my piano lessons.
What Is a Tie in Music? A Simple Definition
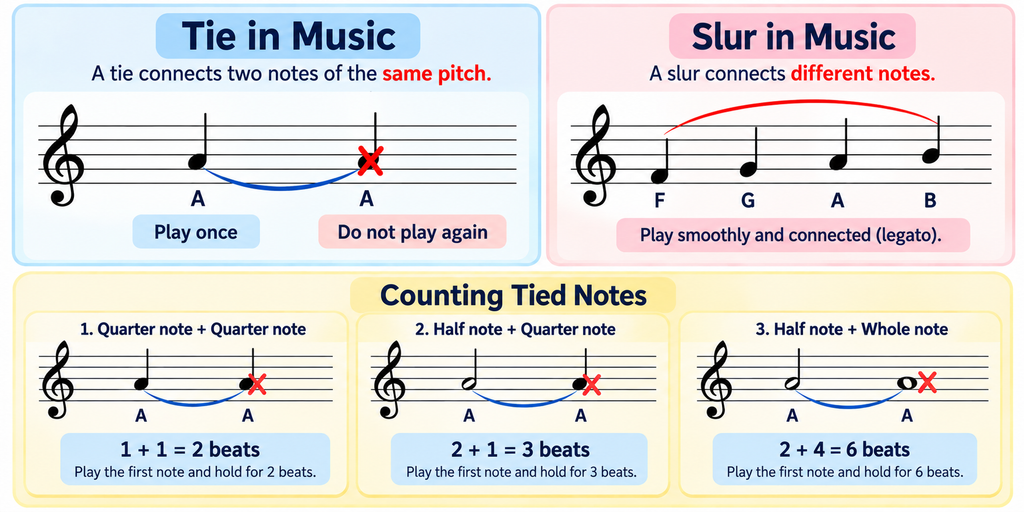
A tie in music is a curved line that connects two notes of the same pitch.
A tie tells the musician to play the first note once and hold it for the combined value of both notes.
The second note is not played again.
For example:
- Quarter note + Quarter note = 2 beats
- Half note + Quarter note = 3 beats
- Half note + Whole note = 6 beats
- Whole note + Half note = 6 beats
These examples assume that a quarter note receives one beat.
A tie can also connect more than two notes of the same pitch. In that case, all the note values are added together.
The most important rule is simple:
Play the first note once and hold it for the total value of the tied notes.
Before learning ties, beginners should understand basic note values. You can review my guide, Quarter Note, Half Note, and Whole Note: A Simple Guide for Piano Beginners.
What Is a Tie in Music vs. a Slur?
One of the first things I teach my students is how to recognize the difference between a tie and a slur.
Both symbols look like curved lines, but they have different meanings.
What Is a Tie?
A tie connects notes of the same pitch and combines their rhythmic values.
For example:
C → C
D → D
G → G
When two notes are tied together, the student plays the first note and continues holding it through the second note’s value.
What Is a Slur?
A slur is also a curved line, but it indicates that notes should be played smoothly and connected.
This is called legato.
For example:
C → D → E → F
Each note is played individually, but the notes are connected smoothly.
A slur usually connects different pitches, although it can also include repeated pitches.
The easiest way to remember the difference is:
Tie = Same pitch, combined duration.
Slur = Smoothly connected notes, played individually.
Understanding this distinction helps students read musical symbols more accurately.
What Is a Tie in Music? 8 Practical Piano Teaching Tips
After teaching piano for 25 years, I have developed several simple methods that help students recognize and play tied notes correctly.
These eight tips can help both children and adult piano beginners.
Tip 1: Look for the Curved Line
The first step in recognizing a tie in music is finding the curved line.
When students see a curved line connecting two notes, I ask:
“Is this a tie or a slur?”
Then I ask another question:
“Are these two notes the same pitch?”
If the curved line connects two notes of the same pitch and combines their duration, it is a tie.
I want students to recognize the symbol before they begin playing.
This simple observation can prevent many rhythm mistakes.
Tip 2: Remember That Tied Notes Must Have the Same Pitch
A common misunderstanding is that tied notes must look exactly the same.
That is not true.
A tie in music connects notes of the same pitch, but their rhythmic values can be different.
For example, the first note might be a D quarter note, and the second note might be a D whole note.
The quarter note has a filled notehead, while the whole note has an open notehead without a stem.
They look different, but they represent the same pitch.
Therefore, they can be connected by a tie.
I remind my students:
“Look at the pitch, not just the shape of the note.”
The note values do not have to match.
The pitch must match.
Tip 3: Add the Note Values Together
Understanding a tie in music requires basic addition.
Music and math work together beautifully when students learn rhythm.
For example:
Quarter note + Quarter note
1 + 1 = 2 beats
Half note + Quarter note
2 + 1 = 3 beats
Half note + Whole note
2 + 4 = 6 beats
I often ask students to calculate the total value before playing.
If a student sees a half note tied to a whole note, I ask:
“How many beats altogether?”
The answer is six beats.
The student must play the first note once and hold it for all six beats.
This is why understanding basic addition can make learning rhythm easier.
For additional practice, visit the free Dots and Ties lesson at MusicTheory.net.
Tip 4: Find Every Tie Before Playing
This is one of my favorite teaching methods.
Before students begin a new piece, I ask:
“Where are the ties?”
Instead of immediately placing their hands on the keyboard, I want them to scan the sheet music first.
Sometimes a piece has only one tie.
Other times, it may have three, five, or even more.
I ask students to point to each tie with their fingers.
This helps them recognize where they need to hold notes longer.
I believe that looking through the music before playing is an important habit.
Students who identify ties ahead of time are better prepared to play them correctly.
Tip 5: Mark an X on the Second Tied Note
One of the most common mistakes beginners make is playing the second tied note again.
For example, if two quarter notes are tied together, the student might play:
C – C
Instead of playing C once and holding it for two beats.
When this happens, I often write a small X on the second note.
The X is my personal teaching reminder, not an official music notation symbol for a tie.
It tells the student:
“Do not play this note again.”
The student still needs to count the second note’s value, but the key should remain pressed.
I use this method frequently because a small visual reminder can make a big difference.
Once the student understands the tie, the reminder is no longer necessary.
Tip 6: Hold the Key and Count Out Loud
Recognizing a tie in music is one thing.
Actually holding the key for the correct amount of time is another.
Some students understand the definition perfectly but release their fingers too early.
When this happens, I count out loud with them.
For example, if the tied notes last four beats, we count:
1 – 2 – 3 – 4
The student must keep the key pressed for the complete duration.
Sometimes I gently guide the student’s hand or help them count while they hold the note.
I may say:
“Hold… 2… 3… 4.”
The goal is to help students connect counting with the physical feeling of holding a key.
Understanding rhythm is not just about knowing numbers. Students must learn to give each note its complete value.
For more counting practice, read How to Count Rhythm in Piano Music: Quarter Notes and Eighth Notes for Beginners.
Tip 7: Watch for a Tie Across a Bar Line
A tie in music often connects notes across two different measures.
This is very common in piano music.
For example, imagine a quarter note C on beat four of a 4/4 measure tied to a half note C at the beginning of the next measure.
The total duration is three beats.
The student plays C on beat four and continues holding it through beats one and two of the next measure.
The second C is not played again.
The counting might look like this:
Measure 1: 1 – 2 – 3 – 4 (Play C on beat 4)
Measure 2: 1 – 2 (Continue holding C)
Even though the measure changes, the sound must continue without being played again.
When students have trouble, I mark an X on the second note.
I also remind them:
“A bar line does not mean stop.”
You can learn more about this in my article, What Is a Measure in Music? Bar Lines Explained for Piano Beginners.
Tip 8: Pay Special Attention When the Staff System Changes
This is another important situation that beginning piano students often overlook.
Sometimes a tie begins at the end of one line of sheet music and continues at the beginning of the next line.
For example, the last note on the first line might be D.
The first note on the next line is also D, connected by a tie.
Because the music continues on a new staff system, the two notes appear far apart on the page.
In standard notation, the tie is usually shown in two parts.
One curved line extends from the last note toward the right edge of the first system.
Another curved line appears at the beginning of the next system, leading into the first note.
Together, these markings show that the same pitch continues across the line break.
The student must not play the second D again.
I often tell my students:
“Attention! Look carefully!”
Then I write HOLD above the last note on the first line.
This reminds the student not to release the key when their eyes move down to the next line of music.
I may also mark an X on the first note of the next line.
These small reminders help students understand that a tie continues even when the printed music moves to a new line.
The page layout changes, but the sound must remain connected.
Common Mistakes When Playing a Tie in Music
Even after students understand what a tie means, they may still make a few mistakes.
The most common problems I see include:
- Playing the second tied note again
- Releasing the key too early
- Confusing a tie with a slur
- Forgetting to add the note values
- Missing ties that cross bar lines
- Overlooking ties that continue onto the next staff system
When these mistakes happen, I do not want students to restart the entire piece every time.
Instead, I ask them to stop, identify the tie, and practice the small section slowly.
Sometimes we repeat just one or two measures until the student can hold the tied note correctly.
Then we connect that section to the surrounding music.
This approach helps students focus on the specific problem instead of repeating the same mistake throughout the entire piece.
Why Understanding What a Tie Is in Music Matters
Learning a tie in music is an important part of developing accurate rhythm.
A student may recognize every note on the staff and press every correct key.
However, if the note values are incorrect, the music will not sound as written.
A tie changes how long a note continues.
It does not change the pitch.
When students understand tied notes, they begin to recognize how rhythm can continue across beats, measures, and even staff systems.
They also become more confident reading sheet music independently.
This is why I encourage students to find ties before they start playing.
Good music reading begins with careful observation.
Frequently Asked Questions: What Is a Tie in Music?
Can a Tie Connect Different Note Values?
Yes.
A tie can connect notes with different rhythmic values, such as a quarter note and a half note.
The notes must have the same pitch, but their durations do not need to match.
Can a Tie Cross a Bar Line?
Yes.
A tie can connect notes across a bar line.
The musician holds the first note through the combined duration without playing the second note again.
Can a Tie Connect More Than Two Notes?
Yes.
A series of three or more notes of the same pitch can be connected by ties.
The musician plays the first note once and holds it for the combined value of all the connected notes.
What Is the Difference Between a Tie and a Slur?
A tie combines the duration of notes of the same pitch.
A slur indicates that notes should be played smoothly and connected.
The two symbols may look similar, but they serve different musical purposes.
Do You Play the Second Note of a Tie?
No.
The second tied note is not played again.
You continue holding the first note for the combined duration of both notes.
If several notes are tied together, the same rule applies.
Final Thoughts: What Is a Tie in Music?
A tie in music may look like a small curved line, but it has an important job.
It tells the musician to combine note values and continue holding the same pitch.
After 25 years of teaching piano, I have found that simple reminders can help beginners understand ties more easily.
Before playing, look through the music and find the ties.
Check whether the notes have the same pitch.
Add their rhythmic values together.
Remember not to play the second tied note again.
And most importantly, hold the key for the complete duration.
If a tie continues across a bar line or onto the next staff system, keep holding the note until its full value is complete.
With careful counting and regular practice, reading tied notes can become a natural part of playing the piano.
Remember: Find the tie, add the beats, play once, and hold!